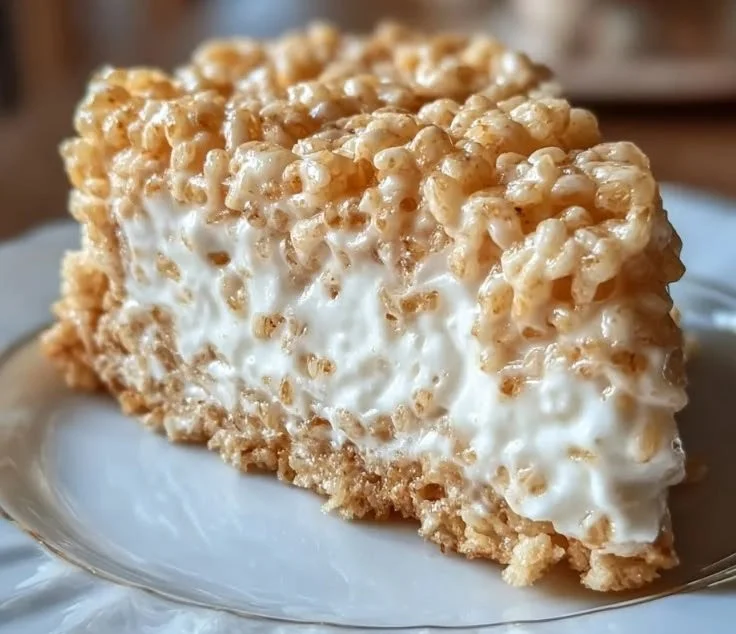
When I was a child, I had a sweet tooth that could rival a candy factory’s! One of my absolute favorite treats was the iconic Rice Krispy Treats – those marshmallow-drenched, buttery squares that seemed to melt in your mouth. Fast forward to adulthood, and I found myself longing for those nostalgic flavors but craving a more sophisticated dessert, ideal for celebrations or an indulgent evening treat. That’s when the idea for a Rice Krispy Treat No-Bake Cheesecake collided with my sweet memories. Imagine a creamy cheesecake layered on a crunchy, marshmallow-infused Rice Krispies crust. It’s a no-bake wonder that combines the best of both worlds: childhood nostalgia and adult elegance.
So, let’s transform humble cereal and sweet marshmallows into a show-stopping cheesecake that will have your friends and family begging for seconds!
Recipe Timing
- Prep Duration: 30 minutes
- Active Cooking: 15 minutes
- Total Duration: 4 hours 30 minutes (including refrigeration)
- Portion Size: Serves 8
- Complexity: Simple
Nutritional Recipe
- Calories per portion: Approximately 350
- Protein: 4 grams per serving
- Carbs: 42 grams per serving
- Fats: 20 grams per serving
- Fiber: 1 gram per serving
- Sugars: 20 grams per serving
- Sodium: 150 mg per serving
Why You’ll Love This Rice Krispy Treat No-Bake Cheesecake
This no-bake cheesecake is the ultimate dessert for any occasion. It’s exceptionally easy to make, requiring no time in the oven, which means you can keep cool during the warmer months. The delightful contrast between the crunchy Rice Krispies crust and the smooth, creamy cheesecake filling creates a sensational texture that is simply irresistible. Plus, it’s so visually appetizing! They’ll take one look at this dessert and be instantly transported back to their childhood.
The Complete Cooking Journey
So let’s embark on this simple yet delicious journey to create your very own Rice Krispy Treat No-Bake Cheesecake. With just a few steps, you’ll have a delightful treat that’s perfect for gatherings or a cozy night in.
Ingredients:
- 4 cups Rice Krispies cereal
- 1/4 cup butter
- 1 bag (10 oz) marshmallows
- 1 cup cream cheese, softened
- 1 cup powdered sugar
- 1 teaspoon vanilla extract
- 1 cup heavy cream
Method:
Step 1: Melt the Butter & Marshmallows
In a large saucepan, melt the butter over low heat. Once melted, add the marshmallows and stir continuously until fully melted and smooth. It’s like creating a comforting blanket of sweetness that will coat our Rice Krispies!
Step 2: Coat the Rice Krispies
Remove the saucepan from heat and quickly stir in the Rice Krispies cereal until every piece is luxuriously coated with marshmallow goodness. The aroma will take you right back to childhood!
Step 3: Form the Crust
Grab a greased springform pan, and press half of the Rice Krispies mixture firmly into the bottom. This will serve as the sturdy, delectable crust for your cheesecake.
Step 4: Prepare the Cream Cheese Filling
In a mixing bowl, beat the softened cream cheese, powdered sugar, and vanilla extract together until they form a creamy, dreamy mixture. This texture sets the stage for the cheesecake filling.
Step 5: Whip the Heavy Cream
In another bowl, whip the heavy cream until stiff peaks form. This is the secret magic that lightens the cheesecake filling to a luscious consistency!
Step 6: Combine Cream Cheese Mix with Whipped Cream
Gently fold the whipped cream into the cream cheese mixture until well combined. Be careful – you want to keep that airiness for a fluffy cheesecake!
Step 7: Spread the Cream Cheese Filling
Evenly spread this creamy delight over the crust in the springform pan. Savor the moment—the smell is divine!
Step 8: Top it Off
Take the remaining Rice Krispies mixture and sprinkle it over the cheesecake filling, pressing down lightly to ensure it holds together once chilled.
Step 9: Refrigerate and Chill
Refrigerate the cheesecake for at least 4 hours (or overnight if you can wait!). Trust me, the longer it chills, the better it gets!
Serving Suggestions & Pairings
Once it’s ready, serve this masterpiece with a drizzle of chocolate sauce, a dollop of whipped cream, or fresh berries for a delightful contrast. It makes a fantastic addition to any summer gathering or family celebration—it’s sure to be a hit!
Storage & Leftovers Guide
Leftovers? Lucky you! This cheesecake can be stored tightly wrapped in the refrigerator for up to 3 days. However, I doubt there will be much left after serving it to your guests.
Kitchen Wisdom & Success Tips
- For a more decadent treat, consider adding crushed nuts or chocolate chips to the Rice Krispies mixture.
- Try different flavor extracts, like almond or lemon, to jazz up the cream cheese filling!
Flavor Variations & Adaptations
Feeling adventurous? Try adding fruit purées or flavored gelatin to the filling for an exciting twist. Or use gluten-free Rice Krispies if you need a gluten-free version!
Reader Questions & Solutions
-
Can I use mini marshmallows instead of standard-sized?
Absolutely! Mini marshmallows will melt just as beautifully, and they can be easier to incorporate into the mix. -
What if I don’t have a springform pan?
No problem! You can use any round or square baking dish; just make sure it’s well-greased so you can easily remove the cheesecake. -
How can I make it a chocolate cheesecake?
Just add a few tablespoons of cocoa powder to the cream cheese mixture for a rich chocolate flavor! -
Can I freeze this cheesecake?
Yes, you can freeze it! Just make sure to wrap it tightly and enjoy it within a month. -
What can I replace the heavy cream with for a lower-calorie version?
You can use whipped topping or low-fat cream cheese instead of heavy cream. Just note it may alter the texture slightly.
Wrapping Up
There you have it! With just a few simple steps, you can create a Rice Krispy Treat No-Bake Cheesecake that’s not only delicious but also a delightful trip down memory lane. I hope you’ll try this recipe and share your results. And remember, cooking is all about joy and discovery—celebrate each creation, and don’t be afraid to make it your own. Happy baking!
PrintRice Krispy Treat No-Bake Cheesecake
A nostalgic no-bake cheesecake with a crunchy Rice Krispies crust and creamy filling, perfect for any celebration.
- Prep Time: 30 minutes
- Cook Time: 15 minutes
- Total Time: 270 minutes
- Yield: 8 servings 1x
- Category: Dessert
- Method: No-Bake
- Cuisine: American
- Diet: Vegetarian
Ingredients
- 4 cups Rice Krispies cereal
- 1/4 cup butter
- 1 bag (10 oz) marshmallows
- 1 cup cream cheese, softened
- 1 cup powdered sugar
- 1 teaspoon vanilla extract
- 1 cup heavy cream
Instructions
- Melt the butter and marshmallows in a large saucepan over low heat.
- Coat the Rice Krispies cereal with the melted mixture.
- Form the crust by pressing half of the Rice Krispies mixture into a greased springform pan.
- Prepare the filling by beating the cream cheese, powdered sugar, and vanilla extract until smooth.
- Whip the heavy cream in a separate bowl until stiff peaks form.
- Combine the whipped cream with the cream cheese mixture gently.
- Spread the cream cheese filling evenly over the crust.
- Top with the remaining Rice Krispies mixture.
- Refrigerate for at least 4 hours before serving.
Notes
Serve with chocolate sauce, whipped cream, or fresh berries for added flavor.
Nutrition
- Serving Size: 1 slice
- Calories: 350
- Sugar: 20g
- Sodium: 150mg
- Fat: 20g
- Saturated Fat: 10g
- Unsaturated Fat: 8g
- Trans Fat: 0g
- Carbohydrates: 42g
- Fiber: 1g
- Protein: 4g
- Cholesterol: 30mg